Sabtu, 20 Juli 2013

How to Install the Alexa Rank Widget


After doing a Blog on Alexa registration phase, the next step is to install the Alexa widget on your blogspot. If this is referred to as a necessity, actually not really. It's just that this time, and until the date the assessment and provide a page rank that is recognized internationally for every website is Page Rank Alexa.

Because of this, it would be very helpful if you register a blog at Alexa, and Alexa Rank Widget installed on every blog you have. As mentioned before in posts How to Apply Blog to Alexa, it will greatly affect the assessment itself Alexa Blog Widget or using the toolbar.

Widget Alexa Rank

Below is a complete explanation of how to install the Alexa Widget:
Please login first to http://www.alexa.com/
Alexa on select My Site Dashboard and select your blog account
Then select Edit Listing
Then click View Site Listing
view listing
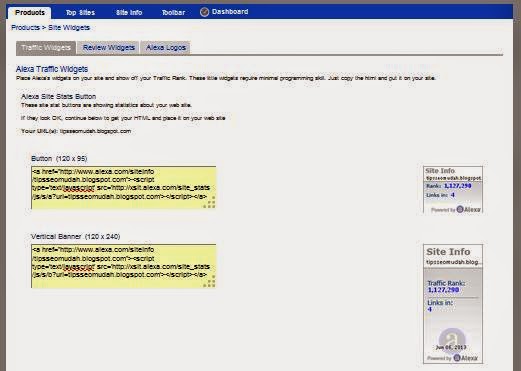
The right side of the page view site listing please you select Get Widget
Then the widget page there are several options, such as the example shown below. Later in the URL box you simply enter the address of your blog, and then click Build Widget.


pilih get widget
Well on the left box to copy the widget code scripts and plug the gadget in blogspot.
SALIN KODE SCRIPT WIDGET ALEXA


Here's how to install the Alexa widget on Blogspot.
Log into your Blogger account
Click Layout
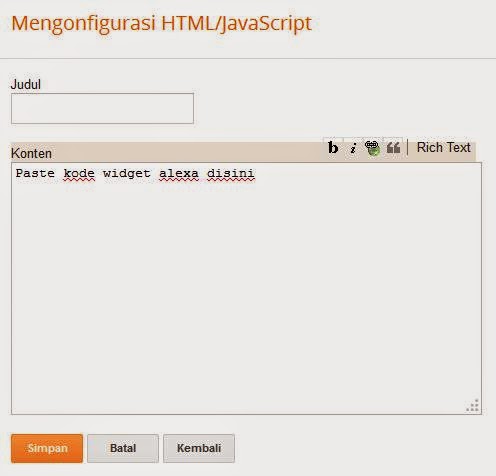
Click Add Gadget and select HTM / Java Script
Tambahkan Gadget


Then Paste Alexa Widget script code that you copy the HTML Gadget was on the box, and do not forget to click Save. See the explanatory drawings.

Menempatkan script widget alexa pada blogspot

Thus my full explanation of how to install the Alexa rank widget. Hopefully this article is useful, and could help the beginner blogger friends who are just learning to make blog.

Thanks.....

HOW TO MAKE A BLOG Free in 3 MINUTES blogspot


How To Make Free And Easy Blog - Blogs can be said is short for web blog. His own blog is a web application that is similar writings in a public web page. Web sites like these can usually be accessed by all users of the internet, it is also appropriate to the theme and purpose of the blog users. Currently the user's own blog as it's been more and more, it is also seen from the visitors of the Internet world that increasingly requires various kinds of information.

How to Create a Blog

Of the many who have a blog, you may also want to also have a blog in order to channel the posts that you create that can be seen by the crowd. How to create a blog you could say there are easy and some are quite difficult, it all can be seen from where we will create a blog. If you want to start a blog that we could easily use a free blog service, the provider is quite a lot, one of them is Blogger. How do I create a blog on blogger? Take it as today we will give you information about how to create a free blog on blogger and easy.

The first thing we need to have when creating a blog is to have an email account from Gmail, because Gmail and Blogger are interrelated. Once we have or create a Gmail account on the email, we go directly to the site www.blogger.com, and blogger pages that we visit will look like the image below.


After that to facilitate our next step in how to create a blog, take a look at the lower right side, and a change to the Indonesian language. After completion of our new entrance and login to follow the next steps. And then you will see that you have the profile, and then click Continue in order to create a new blog entry.


After the steps above, it would appear as shown below. How to create a blog to continue, you just simply click the New Blog.


Then after you click on the new blog, the images like the one below will appear.


In the picture above you all have to fill each column, the column title is filled with the name of the blog you want to create, then filled in the Address column to fill in the address of your blog will be created, but before going on check the availability of the name that you create. In the Template field there are a lot of templates and images you have to choose one, then you just click on the last button for blogs. After the above steps resolved, then the way to make your new blog continues and will appear like the picture below.


There it says "your blog has been created!" first and then to start writing, you just click the "start posting", and the image will appear as below.


The picture above is a place to write posts that you create that can be posted on your own blog. Sheet works almost like Ms Word. Once you make a post you just post them, and perhaps post that you make will be seen by many internet visitors.

Thanks you<<<<<  : )